Showing posts with label Sewing. Show all posts

Saturday, August 12, 2017

Vintage Sewing Kit

Way back in May, my Uncle Stan called me and asked me to stop by next time I was in the neighborhood, he had something to give me.
He had 3 or 4 little sewing kits and let me have my pick of the litter.
I chose wisely.
 
 
Squeeeeeee!  Look at the cute little spools of thread and the cute little scissors!


I found another one on EBAY and they say it is from the 1950s (they want 40$ for that one) and over the past few months have only seen this other one on line that is BLUE, most seem to be red. 
Mine looks pretty identical, except it's missing the white, ribbon bow and mine has a yellow, plastic thimble! So, I think I have all of the pieces to my kit, which is nice to know.
Here is the one from EBAY (below).
 
 
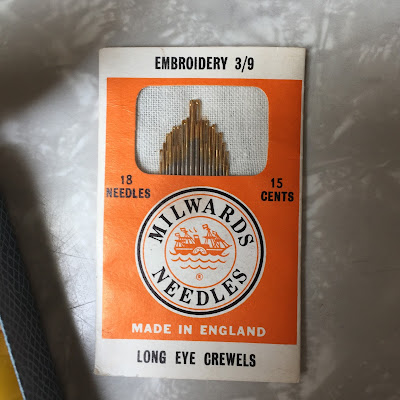
He even gave me this pack of needles (made in England!)  Thanks Uncle Stan!


That's all for today!  Until another time have a happy stitchy day!

Friday, March 15, 2013

Kitchen Curtain Re-do...Again

A few weeks ago, I decided to re-do my kitchen curtains (again).  I didn't like that there was not much of a ruffle at the top. 
Here is what they have looked like for the past year or so.
As I was searching through some photos from a few years ago, I came across this cute little valance that I had captured on camera while visiting a local shop.  This valance was more like what I was going for when I made the curtains above.
I like that this valance has a bit of a ruffle at the very top.
So down came the curtains.  I turned them upside down, sewed a seam through the wider red checked border and used a seam ripper to open each end to allow a curtain rod through it.  Then I removed the seam that used to be the top (the wrinkled part). 
At this point, the curtains were a little too long to be valances and would need to be shortened.  I completely removed the small red strip at the bottom, trimmed the cloth and re-sewed the red strip back onto the curtain.
The above photo shows how far I have gotten with this project.  I've always wanted to do some red work on my valances and this seemed to be the perfect time to do so.  The small, white strip of cloth at the bottom needs to be hemmed...the bottom valance has that part pinned, but not sewn as of yet.
I can't wait to finish them and hang them!  I will snap a photo or two of the finished project to share with you all!
Oh!  If you are wondering where I found the adorable fruit patterns for the red work, they are from this WONDERFUL flickr group, "Vintage Embroidery Patterns".  Click here to visit their home page! Click here for the page with the actual "fruit" motifs.

Until another day,
Have a happy stitching day!!

Thursday, July 26, 2012

Little Jars


Would you believe this is the only Youtube entry of Hop, Skip and Jump By Artie Shaw I could find!?  Oh how I miss my play list!  I drive around to this in my car...yeah, I'm that nerdy.  Can I just pretend I'm driving around town in a cute little 55 Chevy with this cranked up?
Anyway, onto today's post...
I have a weakness for cute little jars...and not just jars but any kind of cute little container.  I keep
boxes too (like the ones cell phones and ipods come in) I turn them inside out and paint them.  I'm a collector and a "concealer" and am not sure where the sickness comes from (Grandma Eva perhaps, she saved everything in little margarine tubs and Schwan's boxes.)  Maybe there is a 12 step program I could go through to rid myself of this container saving habit.   
Until then, I will decorate and use them to my hearts content.
Here are a couple of my favorite little jars.
There is a reason they don't have lids....they hold stuff for me.
Tah-Dah!  Maybe I should add some glitter to my little bluebird friends before I clear coat them. I just love the little boy bluebird's flat cap! This bluebird couple was runner-up to adorn the top of my blue spice rack, but Autumn liked the bluebirds with roses better. So I glued these birds to a jar instead.
Later........I found some inexpensive little daisy appliques at Joann's!

The daisy appliques make the jar a just a wee bit cuter.

That's all for today, 'till tomorrow,
Have a Happy Day!

Wednesday, July 25, 2012

Pretty Pins

Here is another craft project Autumn and I did over the weekend.  We transformed boring 'ole stick pins into pretty little embellished pins to decorate our pin cushions.
We started with pins, beads and a hotglue gun.  We also used seed beans (not shown).
Here are some of our favorites when we finished.

The pink and green one below is my favorite one.
Who knew we could have so much fun with pins and beads?!
Until Tomorrow,
Have a Happy Day!

Thursday, May 3, 2012

Dresden Quilt

The other day I stumbled upon a blog site that had the most beautiful quilt I'd ever seen.  The lady who had bought it at auction called it a Dresden Quilt.  The quilt was from the 1930's and the quilt top was made using feed sack scraps of cloth. 
Dresden Quilt from A Prairie Home Blog.
Pretty isn't it?  I think so.  So I looked up Dresden on the computer and after watching a couple of tutorials I thought I could try that!  Yeah, 'cause that's what I need in my life is yet another project. (sarcasm).
For years I've said to myself (and others) that quilting is the one thing I would never want to do.  Pottery is another one;  now watch, 10 years from now I will be begging for a potter's wheel.  But quilting has never really appealed to me because it looks like a lot of work.  I like quilts and quilt shows, but I never thought I'd want to sit down, learn how to use a machine and actually sew peices together.  Too much time, too much effort and too many fabrics to choose from.  
Then, I saw and slept under the 1930's quilts at a Scrapbooking retreat last fall and really liked the style and colors of those antique quilts.  I love the reproduction feed sack material that the local quilt shop carries, so there is the answer to what type of fabrics I like.  Then, Shannan gave me a sewing machine for Christmas, and although it looks complicated it's fairly easy to use.  So now I really have no excuse for not quilting (right?). 

1930's Quilt from the Scrapbooking Retreat
Antique Crazy Quilt from the Scrapbooking Retreat
I already have a stash of reproduction 1930 feed sack style fat quarters that I've been using on the bottoms of my embroidered tea towels.  And last night I stopped by JoAnns fabrics and picked up a fat quarter of purple material and a Dresden Template kit (with coupon was only 5$ woot!)  We have a whole sheet of left over batting from a home theater project Shannan was doing.  So all I really need is a few more fat quarters, some kind of lighter fabric to be the block that I sew each flower to and backing fabric.  The project should stay fairly inexpensive (I hope).

So, this evening I had fun making all kinds of little Dresden Petals!  But first I figured I'd better wash my fabrics.  I don't own a pinking shears so the edges were raw edges.
Here are my bright and happy fabrics ready for the wash.

And here are my wet and tangled pieces after.  I learned a lesson and that is to wash small pieces of fabric by hand.  Luckily, there was no harm done and they all untangled and ironed up nicely.
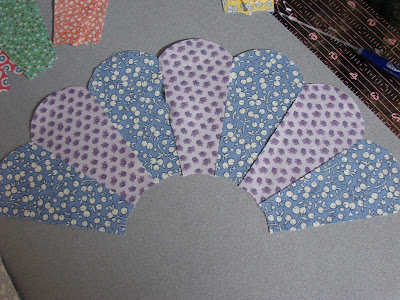
Here are a few of the pieces just placed together.  The circle will ultimately be tighter because the pieces are sewn together using a 1/4 seam allowance.  I think it takes 16 petals to make a full circle.  There are 17 here.
Then I really started to have fun.  I tried many different color combinations.


But my favorite is all of the colors and patterns together.  I'd like to find 5 or 6 more colors/patterns at the quilt store downtown, then I would have a nice variety and wouldn't have to repeat so many of the colors over and over.
It might take me years to finish an actual quilt, or I might start my first block and decide quilting is not for me.  In that case I can always make a pillow.  But I might surprise myself and crank out 3 or 4 blocks by the end of summer.  It will be something new, interesting and challenging and that's just what I need right now in my mundane little world.
Have a Happy Day!

Tuesday, March 27, 2012

New Curtains

I did it!  I made new curtains for our kitchen!  After much dreaming and planning, I decided to go with red gingham.  I've given up on ever having a butter-cream yellow kitchen and have decided to just go with red accents to compliment the dark blue walls.  The curtains are far from perfect, but they were inexpensive to make and they'll do for a couple of years. 
Here is how I did it.
I used flour sack dish towels.  I started by cutting them in half.
Then I folded the sides in just a bit to form the top ruffle of my valances.
Then I added a 3 inch red ruffle to the bottom of each valance and a 1 inch stripe of fabric at the top.  It's hard to explain exactly what I did so I'll just show you the end results.
This is how the valance turned out.  I'd like to do one more for the top to make it just a little fuller.  I'm a beginning sewer, so they are not perfect. I'm in the process of making cafe style curtains for the rod across the middle.
Here was my first attempt at cafe style curtains.  They were not wide enough, so I've started over.  When I get a little further along on them, I will post them. 
Have a Happy Day!

Friday, February 24, 2012

Mini Bolts of Fabric

I'd thought I'd do a quick entry about my fabric storage.  The projects I do are usually quite small, therefore, I don't buy large quantities of fabric at a time.  Instead, I buy little fat quarters here and there and if I don't keep them all together I end up finding them everywhere!  So I did some digging on the internet and found the perfect solution from The Little Green Bean blog.  Here is the link:
http://maluukkonen.blogspot.com/2010/04/new-addiction.html
She uses little foam board pieces and wraps her fabrics around them to create mini bolts of fabric.
Here is how my mini fabric bolt project turned out.
I keep the mini bolts in an old photo storage box in one of my craft drawers.

Here is what the mini bolts look like.  It's so much easier to keep my little bits of fabric organized now that I've done this.  At a glance, I can see what I have.

Tuesday, January 3, 2012

Sewing Machine

For years I thought, "why would I ever need or want a sewing machine? They are scary and complicated and that's just one of those things I will never want." 
I find myself saying this about other things too...like skiing.  I will never ski.  There are too many risks that go along with skiing and the risks outweigh any idea of fun that I might have. 
Also, I will never become a serious quilter.  That is just one hobby that doesn't interest me.  (Now, watch, 10 years from now, I will be a quilter, who owns a set of skis).

This is what I said about a sewing machine.
But this year, as I was scrabbling to finish hemming tea towels and dish towels, Shannan asked me what I wanted for Christmas and I said "a sewing machine".  I will use it to add the little strips of feed sack style fabric to my tea towels.  I have plans for a tablecloth, napkins, and maybe even a skirt or two for myself. 
I'm excited to learn something new and would love to be able to make my own dresses and maybe even some cute things for my daughter. 


It can make quite a few stitches.  I've been brave enough to try a couple but will leave the others until I've had more practice.
The machine I got is exactly the same as my sister-in-laws so she can help me if needed.  She's been using a machine for years and is an accomplished sewer.  She makes dresses for her girls (and Autumn) and just finished a blue jean quilt for her teen aged son!
I'd love to try a cute little project like this owl purse.  It is from a lady on craftster.org.  She made it from an old jacket, added some felt features and it's sooo cute.
Would like to make a simple skirt like the red one above.  Of course I'd like to have her waistline too, but that's a WHOLE other project! lol!
Other things I would love to sew are, needle books, puffy bookmarks, tote bags, tree ornaments.  I'd like to make my own felt valentines this year!  Here are some examples of things I'd like to try.  Of course these are done by professionals, so they all look amazing.  I've collected these images over the years and apologize if I don't remember where they are all from.
These are cute little felt cookies for Valentines Day.  I found them on Pamela Susan's blog where she also has a tutorial showing how to make them.
I'd like to learn how to make adorable little pillows similar to this one from Primrose Designs.  I enjoy this blog and love that she incorporates vintage embroidery designs into her projects.
I LOVE Crayon Roll ups and this is a cute one from the blog, Adam's Blankie.  I love this blog and she has so many cute ideas!  I'd like to make one similar to this.
Have a happy day!!